이 문서에서는 Python에서 테이블을 다루는 방법을 소개하고, 테이블을 가장 쉽게 생성하고 테이블 내부 데이터를 조작하는 방법을 보여드립니다. 우리의 API를 사용하면 테이블을 조작하고 Word, Excel, PDF 등 다양한 형식으로 내보낼 수 있습니다.
Aspose.Words for Python via .NET를 소개하고, 이 API를 사용해 테이블을 생성하고 삽입하는 방법에 중점을 둡니다.

Aspose.Words for Python via .NET
는 Microsoft Word(DOCX, DOC, ODT), 웹(Markdown, HTML), PDF 등 다양한 문서 형식을 읽고 조작하도록 설계된 클래스 라이브러리입니다. 이 Python API를 사용하면 Word 파일을 생성, 편집, 렌더링 및 변환하고, 보고서를 생성하며, 외부 소프트웨어 없이 데이터를 시각화할 수 있습니다.
문서 처리 및 데이터 형식 지정 작업을 위한 100개 이상의 Python 클래스가 제공됩니다.
Python에서 테이블 작업
테이블은 많은 양의 정보를 행과 열로 구성된 격자 형태로 정리하고 표시하는 데 유용합니다. 탭형 데이터를 표시할 때 디자인을 훨씬 세밀하게 제어할 수 있어 매우 유용합니다.
테이블은 행과 열로 구성된 구조화된 데이터 집합이며, 우리 라이브러리에서 완전히 지원됩니다. 테이블을 쉽게 편집, 변경, 추가 및 제거할 수 있습니다.
아래에서는 Python을 사용해 새 테이블을 만드는 방법을 보여주며, 문서에서 서식 적용
, TableStyle 사용
, 열 및 행 작업
, 그리고 테이블 결합 및 분할
방법을 확인할 수 있습니다.
Python에서 테이블 만들기
우리 라이브러리는 문서 내에 새 테이블을 만들기 위한 다양한 메서드를 제공하며, 이 문서에서는 그 중 일부를 사용하는 방법을 살펴봅니다.
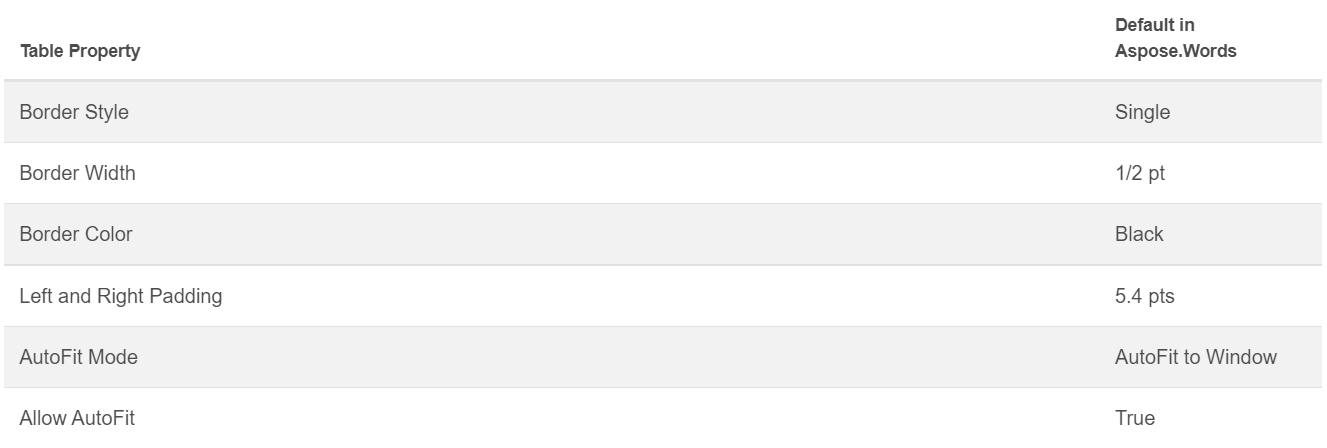
새로 만든 테이블은 Microsoft Word의 기본값과 유사한 값을 가집니다.
다음 메서드를 사용해 DocumentBuilder 클래스
로 테이블을 삽입할 수 있습니다.
• DocumentBuilder.start_table
• DocumentBuilder.insert_cell
• DocumentBuilder.end_row
• DocumentBuilder.end_table
• DocumentBuilder.writeln
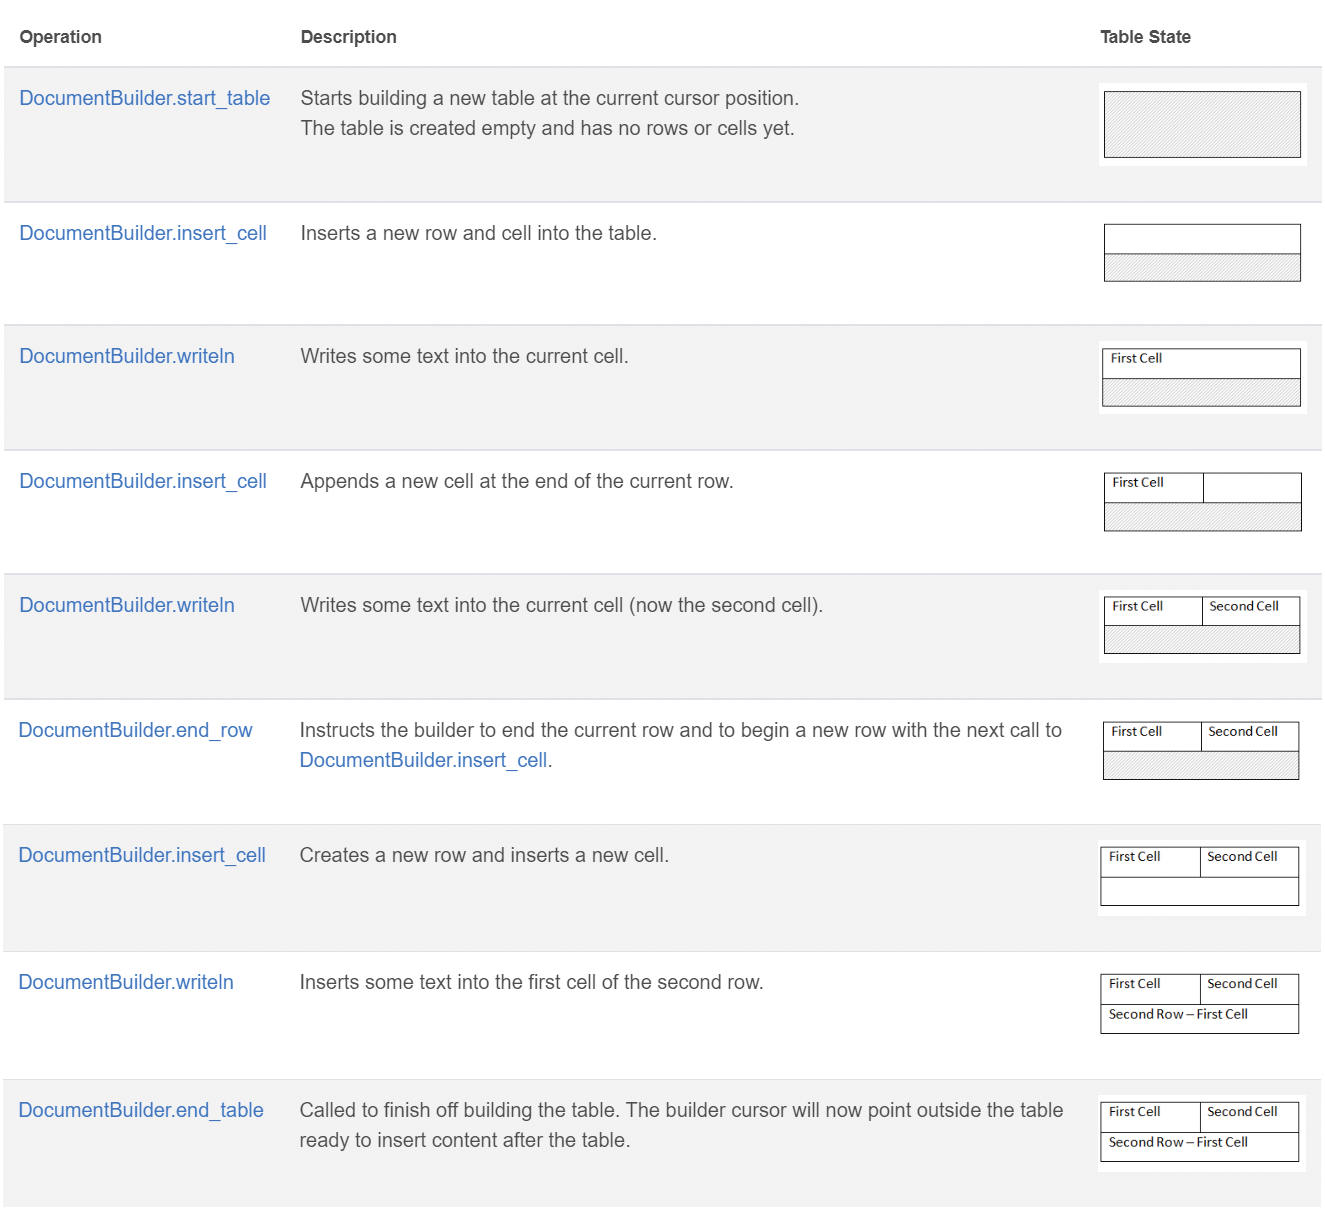
Python에서 7단계로 테이블 만들기:
DocumentBuilder.start_table으로 테이블을 시작합니다.DocumentBuilder.insert_cell을 사용해 셀을 삽입하고, DocumentBuilder.cell_format으로 셀 서식을 지정합니다.DocumentBuilder를 사용해 셀 내용을 삽입합니다.- 행이 완성될 때까지 2와 3을 반복합니다.
DocumentBuilder.end_row 메서드로 행을 종료하고, DocumentBuilder.row_format으로 행 서식을 지정합니다.- 테이블이 완성될 때까지 2~5를 반복합니다.
DocumentBuilder.end_table 메서드로 테이블 작성을 마칩니다.
테이블 생성에 관한 DocumentBuilder 클래스와 메서드에 대한 자세한 내용은 우리의 문서
에서 확인할 수 있습니다.
아래 예제에서는 DocumentBuilder를 사용해 기본 서식이 적용된 간단한 테이블을 만드는 방법을 보여줍니다.
# For complete examples and data files, please go to https://github.com/aspose-words/Aspose.Words-for-Python-via-.NET
doc = aw.Document()
builder = aw.DocumentBuilder(doc)

# Start building the table.
builder.start_table()
builder.insert_cell()
builder.write("Row 1, Cell 1 Content.")

# Build the second cell.
builder.insert_cell()
builder.write("Row 1, Cell 2 Content.")

# Call the following method to end the row and start a new row.
builder.end_row()

# Build the first cell of the second row.
builder.insert_cell()
builder.write("Row 2, Cell 1 Content")

# Build the second cell.
builder.insert_cell()
builder.write("Row 2, Cell 2 Content.")
builder.end_row()

# Signal that we have finished building the table.
builder.end_table()

doc.save(docs_base.artifacts_dir + "WorkingWithTables.create_simple_table.docx")
다음 코드를 사용해 DocumentBuilder
로 서식이 적용된 테이블을 만들 수 있습니다.
# For complete examples and data files, please go to https://github.com/aspose-words/Aspose.Words-for-Python-via-.NET
doc = aw.Document()
builder = aw.DocumentBuilder(doc)

table = builder.start_table()
builder.insert_cell()

# Table wide formatting must be applied after at least one row is present in the table.
table.left_indent = 20.0

# Set height and define the height rule for the header row.
builder.row_format.height = 40.0
builder.row_format.height_rule = aw.HeightRule.AT_LEAST

builder.cell_format.shading.background_pattern_color = drawing.Color.from_argb(198, 217, 241)
builder.paragraph_format.alignment = aw.ParagraphAlignment.CENTER
builder.font.size = 16
builder.font.name = "Arial"
builder.font.bold = True

builder.cell_format.width = 100.0
builder.write("Header Row,\n Cell 1")

# We don't need to specify this cell's width because it's inherited from the previous cell.
builder.insert_cell()
builder.write("Header Row,\n Cell 2")

builder.insert_cell()
builder.cell_format.width = 200.0
builder.write("Header Row,\n Cell 3")
builder.end_row()

builder.cell_format.shading.background_pattern_color = drawing.Color.white
builder.cell_format.width = 100.0
builder.cell_format.vertical_alignment = aw.tables.CellVerticalAlignment.CENTER

# Reset height and define a different height rule for table body.
builder.row_format.height = 30.0
builder.row_format.height_rule = aw.HeightRule.AUTO
builder.insert_cell()

# Reset font formatting.
builder.font.size = 12
builder.font.bold = False

builder.write("Row 1, Cell 1 Content")
builder.insert_cell()
builder.write("Row 1, Cell 2 Content")

builder.insert_cell()
builder.cell_format.width = 200.0
builder.write("Row 1, Cell 3 Content")
builder.end_row()

builder.insert_cell()
builder.cell_format.width = 100.0
builder.write("Row 2, Cell 1 Content")

builder.insert_cell()
builder.write("Row 2, Cell 2 Content")

builder.insert_cell()
builder.cell_format.width = 200.0
builder.write("Row 2, Cell 3 Content.")
builder.end_row()
builder.end_table()

doc.save(docs_base.artifacts_dir + "WorkingWithTables.formatted_table.docx")
기존 테이블 삽입
문서에 이미 테이블이 존재하고 해당 테이블을 복사해 변경하고 싶다면, 가장 쉬운 방법은 Table.clone
메서드를 사용해 모든 서식을 유지하면서 복제하는 것입니다.
아래 예제에서는 테이블을 삽입하는 방법을 보여주며, 예제에 사용된 템플릿 파일이 필요하면 여기
에서 다운로드할 수 있습니다.
# For complete examples and data files, please go to https://github.com/aspose-words/Aspose.Words-for-Python-via-.NET
doc = aw.Document(docs_base.my_dir + "Tables.docx")

table = doc.get_child(aw.NodeType.TABLE, 0, True).as_table()

# Clone the table and insert it into the document after the original.
tableClone = table.clone(True).as_table()
table.parent_node.insert_after(tableClone, table)

# Insert an empty paragraph between the two tables,
# or else they will be combined into one upon saving this has to do with document validation.
table.parent_node.insert_after(aw.Paragraph(doc), table)

doc.save(docs_base.artifacts_dir + "WorkingWithTables.clone_complete_table.docx")
테이블에 관한 질문이 있거나 Aspose.Words for Python via .NET 제품에 대한 도움이 필요하고, 프로젝트에 API를 구현하려면 유료 지원 개발자
에게 문의해 주세요.