この記事では Python でテーブルを扱う方法を紹介し、テーブルの作成とテーブル内データの操作の最も簡単な手順を示します。API を使用すれば、テーブルを操作し、Word、Excel、PDF などのさまざまな形式にエクスポートできます。
Aspose.Words for Python via .NET を導入し、この API を使ったテーブルの作成と挿入に焦点を当てます。

Aspose.Words for Python via .NET
は、Microsoft Word(DOCX、DOC、ODT)、Web(Markdown、HTML)、PDF など多数のドキュメントタイプを読み取り・操作できるクラスライブラリです。この Python API を使用すれば、Word ファイルの作成、編集、レンダリング、変換、レポート生成、データの可視化が外部ソフトウェアなしで可能です。
ドキュメント処理とデータ書式設定操作のための 100 以上の Python クラスが利用できます。
Python でテーブルを操作する
テーブルは大量の情報を行と列のグリッド構造で整理・表示するためのものです。タブ付きデータの表示に非常に有用で、コンテンツのデザインを細かく制御できます。
テーブルは行と列からなる構造化データの集合で、当ライブラリで完全にサポートされており、テーブルの編集、変更、追加、削除が簡単に行えます。
以下では Python で新しいテーブルを作成する方法を示し、ドキュメントでは 書式設定の適用
、TableStyle の使用
、列と行の操作
、テーブルの結合と分割
についても確認できます。
Python でテーブルを作成する
当ライブラリはドキュメント内に新しいテーブルを作成するさまざまな方法を提供しており、この記事ではいくつかの手法を紹介します。
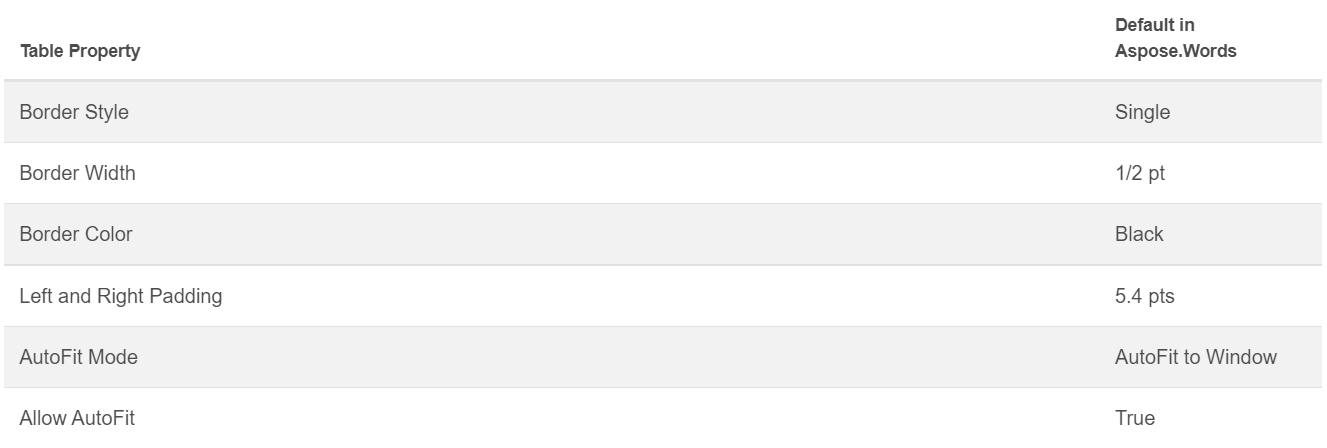
新しく作成されたテーブルは Microsoft Word のデフォルト設定に近い値が設定されます。
DocumentBuilder クラス
を使用してテーブルを挿入し、次のメソッドでテーブルを構築します。
• DocumentBuilder.start_table
• DocumentBuilder.insert_cell
• DocumentBuilder.end_row
• DocumentBuilder.end_table
• DocumentBuilder.writeln
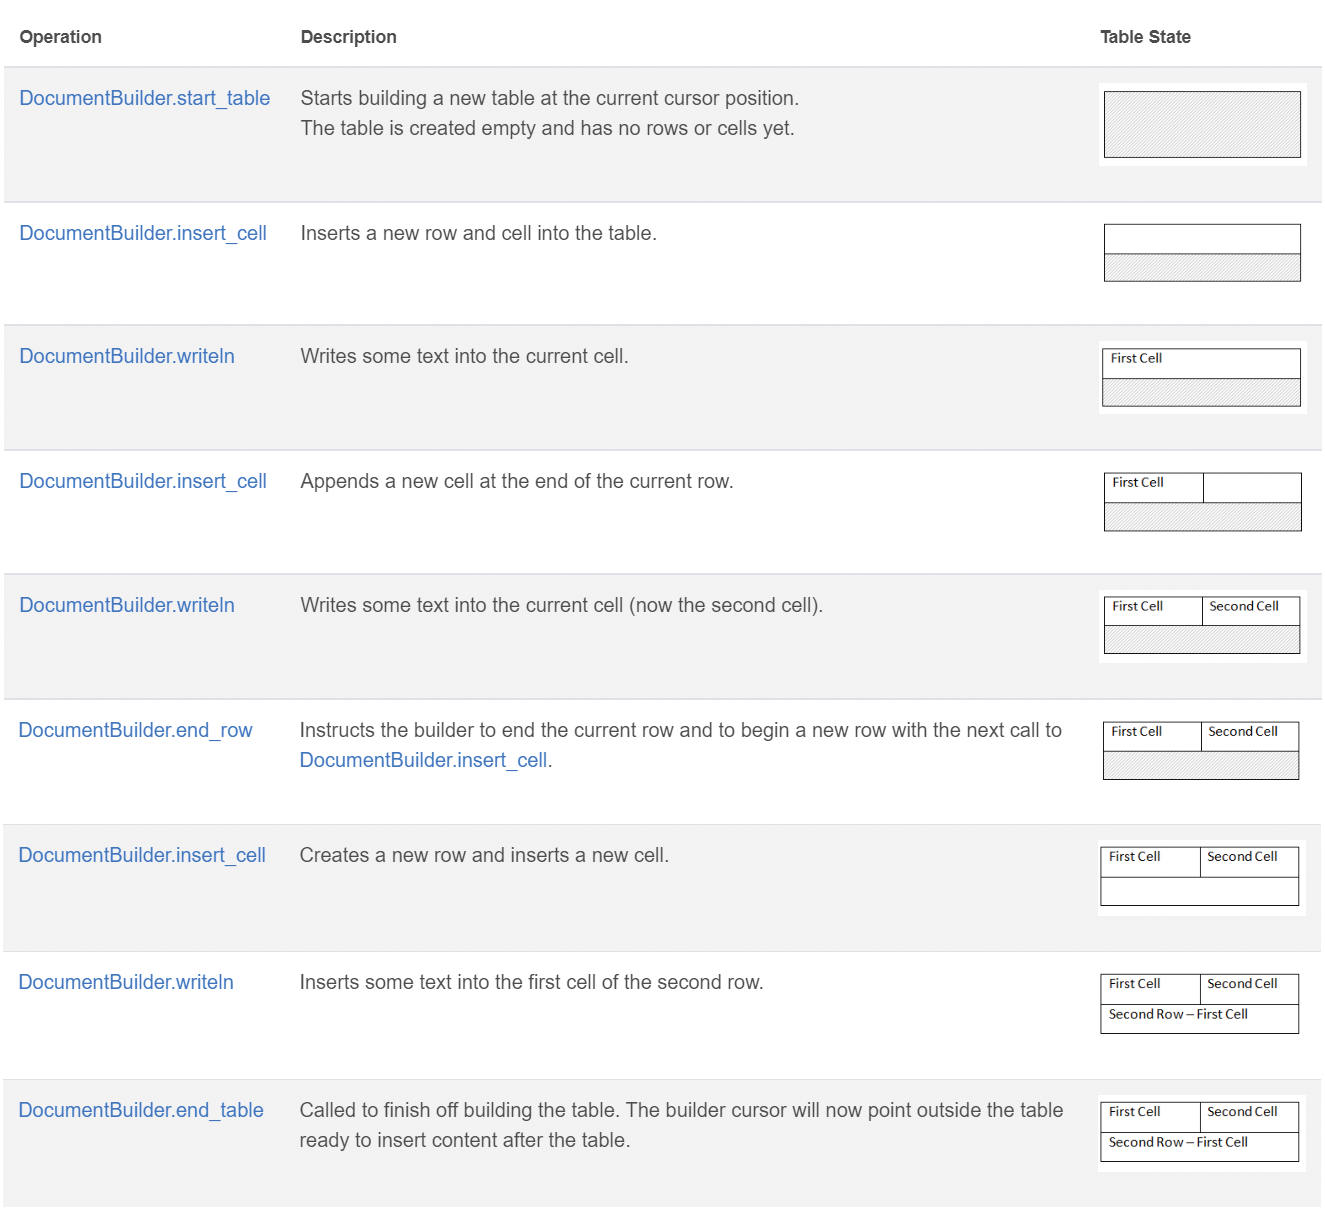
Python でテーブルを作成する 7 手順:
DocumentBuilder.start_table でテーブルを開始します。DocumentBuilder.insert_cell でセルを挿入し、DocumentBuilder.cell_format でセルの書式を指定します。DocumentBuilder を使用してセルの内容を書き込みます。- 手順 2 と 3 を繰り返して行を完成させます。
DocumentBuilder.end_row で行を終了し、DocumentBuilder.row_format で行の書式を設定します。- 手順 2〜5 を繰り返してテーブル全体を完成させます。
DocumentBuilder.end_table でテーブルを終了します。
テーブル作成に関する DocumentBuilder クラスとメソッドの詳細は、ドキュメント
をご参照ください。
以下の例では DocumentBuilder を使用してデフォルト書式のシンプルなテーブルを作成する方法を示します。
# For complete examples and data files, please go to https://github.com/aspose-words/Aspose.Words-for-Python-via-.NET
doc = aw.Document()
builder = aw.DocumentBuilder(doc)

# Start building the table.
builder.start_table()
builder.insert_cell()
builder.write("Row 1, Cell 1 Content.")

# Build the second cell.
builder.insert_cell()
builder.write("Row 1, Cell 2 Content.")

# Call the following method to end the row and start a new row.
builder.end_row()

# Build the first cell of the second row.
builder.insert_cell()
builder.write("Row 2, Cell 1 Content")

# Build the second cell.
builder.insert_cell()
builder.write("Row 2, Cell 2 Content.")
builder.end_row()

# Signal that we have finished building the table.
builder.end_table()

doc.save(docs_base.artifacts_dir + "WorkingWithTables.create_simple_table.docx")
DocumentBuilder を使用して書式設定されたテーブルを作成する例を以下に示します。
# For complete examples and data files, please go to https://github.com/aspose-words/Aspose.Words-for-Python-via-.NET
doc = aw.Document()
builder = aw.DocumentBuilder(doc)

table = builder.start_table()
builder.insert_cell()

# テーブル全体の書式は、少なくとも 1 行が存在した後に適用します。
table.left_indent = 20.0

# ヘッダー行の高さと高さルールを設定します。
builder.row_format.height = 40.0
builder.row_format.height_rule = aw.HeightRule.AT_LEAST

builder.cell_format.shading.background_pattern_color = drawing.Color.from_argb(198, 217, 241)
builder.paragraph_format.alignment = aw.ParagraphAlignment.CENTER
builder.font.size = 16
builder.font.name = "Arial"
builder.font.bold = True

builder.cell_format.width = 100.0
builder.write("Header Row,\n Cell 1")

# 前のセルから幅が継承されるため、ここでは幅を指定しません。
builder.insert_cell()
builder.write("Header Row,\n Cell 2")

builder.insert_cell()
builder.cell_format.width = 200.0
builder.write("Header Row,\n Cell 3")
builder.end_row()

builder.cell_format.shading.background_pattern_color = drawing.Color.white
builder.cell_format.width = 100.0
builder.cell_format.vertical_alignment = aw.tables.CellVerticalAlignment.CENTER

# テーブル本体の高さと高さルールをリセットします。
builder.row_format.height = 30.0
builder.row_format.height_rule = aw.HeightRule.AUTO
builder.insert_cell()

# フォント書式をリセットします。
builder.font.size = 12
builder.font.bold = False

builder.write("Row 1, Cell 1 Content")
builder.insert_cell()
builder.write("Row 1, Cell 2 Content")

builder.insert_cell()
builder.cell_format.width = 200.0
builder.write("Row 1, Cell 3 Content")
builder.end_row()

builder.insert_cell()
builder.cell_format.width = 100.0
builder.write("Row 2, Cell 1 Content")

builder.insert_cell()
builder.write("Row 2, Cell 2 Content")

builder.insert_cell()
builder.cell_format.width = 200.0
builder.write("Row 2, Cell 3 Content.")
builder.end_row()
builder.end_table()

doc.save(docs_base.artifacts_dir + "WorkingWithTables.formatted_table.docx")
既存テーブルの挿入
ドキュメントに既にテーブルがあり、そのコピーを挿入して変更したい場合は、Table.clone
メソッドを使用すると、すべての書式を保持したままテーブルを複製できます。
以下の例ではテーブルの挿入方法を示し、サンプルのテンプレートファイルは ここ
からダウンロードできます。
# For complete examples and data files, please go to https://github.com/aspose-words/Aspose.Words-for-Python-via-.NET
doc = aw.Document(docs_base.my_dir + "Tables.docx")

table = doc.get_child(aw.NodeType.TABLE, 0, True).as_table()

# テーブルをクローンし、元のテーブルの後に挿入します。
tableClone = table.clone(True).as_table()
table.parent_node.insert_after(tableClone, table)

# 2 つのテーブルの間に空の段落を挿入します。
# これを行わないと保存時に 1 つのテーブルに結合されてしまいます(ドキュメント検証のため)。
table.parent_node.insert_after(aw.Paragraph(doc), table)

doc.save(docs_base.artifacts_dir + "WorkingWithTables.clone_complete_table.docx")
テーブルや Aspose.Words for Python via .NET 製品に関するご質問や、プロジェクトへの API 実装支援が必要な場合は、有料サポート開発者
にお気軽に お問い合わせください
。